
 مدت زمان مطالعه : 0 دقیقه
 ۱ کامنت
با پیشرفتی که در زمینه تکنولوژی رو به افزایش است، بلوتوث یکی از مهم ترین چیزهایی است که در زندگی با آن سر و کار داریم. با اینکه بسیاری از افراد جهان از بلوتوث استفاده می کنند ولی اطلاعات کمی نسبت به کارکرد آن دارند. تصور کنید که با نفوذ به بلوتوث دستگاه اشخاص، می توان به تمامی اطلاعات آن دستگاه دست یافت! هول نشوید و فقط صبر کنید تا توضیحات مربوطه در این مورد را بشنوید!! زیرا ما در این مقاله آذرسیس نحوه Snoop در دستگاه های بلوتوث دار را با استفاده از کالی لینوکس توضیح خواهیم داد. پس با ما همراه شوید.

برای Recon جهت Snoop در دستگاه های بلوتوث دار چه چیزی لازم است؟
در ابتدا به یک نسخه کاملاً به روز شده از Kali Linux احتیاج دارید. چرا که از ابزارهای داخلی بلوتوث که Kali Linux به طور پیش فرض دارد استفاده خواهید کرد. این ابزارها شامل موارد زیر است:
Btscanner
l2Ping
Sdptool
Hcitool
Bettercap
Hciconfig
البته به یاد داشته باشید که برای Snoop در دستگاه های بلوتوث دار، شما باید به آن دستگاه از نظر موقعیت مکانی نزدیک باشید تا Snoop در دستگاه های بلوتوث دار با کال لینوکس ممکن شود.
قدم اول Snoop در دستگاه های بلوتوث دار: فعال سازی آداپتور بلوتوث با Hciconfig
اگر با iconfig برای کارت ها و آداپتورهای وای فای آشنا هستید، ابزار دیگری وجود دارد که مشابه دستگاه های بلوتوث است و به آن Hciconfig می گویند. پس برای شروع Snoop در دستگاه های بلوتوث دار دستور زیر را وارد کنید:
 hciconfig

hci0 Type: Primary Bus: USB
BD Address: ██:██:██:██:██:██ ACL MTU: 1022:8 SCO MTU: 183.5
DOWN
RX bytes:574 acl:0 sco:0 events:30 errors:0
TX bytes:368 acl:0 sco:0 commands:30 errors:0
در این مثال از Snoop در دستگاه های بلوتوث دار، می توان خط اتصال بلوتوثی را مشاهده کرد! این همان چیزی است که از آن برای انجام کارهای بلوتوثی استفاده خواهید کرد. وقتی Hciconfig را باز می کنید، وضعیت ابزار در حالت DOWN است، وضعیت ابزار باید در حالت UP و Running باشد. اگر یک خط اتصال وای فای دارید که به برق وصل است، اما هنوز راه اندازی نشده است، ابتدا iconfig را سپس نام خط اتصال و بعد کلمه up را تایپ کنید. از آنجایی که iconfig، اساساً همان Hciconfig است، می توانید از بسیاری از دستورات مشابه استفاده کنید، که آن را در صفحه man خواهید کرد.
man hciconfig
HCICONFIG(1) Linux System Administration HCICONFIG(1)
NAME
hciconfig - configure Bluetooth devices
SYNOPSIS
hciconfig -h
hciconfig [-a]
hciconfig [-a] hciX [command [command parameters]]
DESCRIPTION
hciconfig is used to configure Bluetooth devices. hciX is the name of
a Bluetooth device installed in the system. If hciX is not given, hci‐
config prints name and basic information about all the Bluetooth de‐
vices installed in the system. If hciX is given but no command is
given, it prints basic information on device hciX only. Basic informa‐
tion is interface type, BD address, ACL MTU, SCO MTU, flags (up, init,
running, raw, page scan enabled, inquiry scan enabled, inquiry, authen‐
tication enabled, encryption enabled).
OPTIONS
-h, --help
Gives a list of possible commands.
-a, --all
Other than the basic info, print features, packet type, link
policy, link mode, name, class, version.
COMMANDS
up Open and initialize HCI device.
down Close HCI device.
reset Reset HCI device.
rstat Reset statistic counters.
auth Enable authentication (sets device to security mode 3).
noauth Disable authentication.
encrypt Enable encryption (sets device to security mode 3).
noencrypt Disable encryption.
secmgr Enable security manager (current kernel support is limited).
nosecmgr Disable security manager.
piscan Enable page and inquiry scan.
noscan Disable page and inquiry scan.
iscan Enable inquiry scan, disable page scan.
pscan Enable page scan, disable inquiry scan.
ptype [type] With no type , displays the current packet types. Otherwise, all the packet types specified by type are set. type is a comma-separated list of packet types, where the possible packet types are DM1, DM3, DM5, DH1, DH3, DH5, HV1, HV2, HV3.
name [name] With no name, prints local name. Otherwise, sets local name to name.
class [class] With no class, prints class of device. Otherwise, sets class of device to class. class is a 24-bit hex number describing the class of device, as specified in section 1.2 of the Bluetooth Assigned Numers document.
voice [voice] With no voice, prints voice setting. Otherwise, sets voice setting to voice. voice is a 16-bit hex number describing the voice setting.
iac [iac] With no iac, prints the current IAC setting. Otherwise, sets the IAC to iac.
inqtpl [level] With no level, prints out the current inquiry transmit power level. Otherwise, sets inquiry transmit power level to level.
inqmode [mode] With no mode, prints out the current inquiry mode. Otherwise, sets inquiry mode to mode.
inqdata [data] With no name, prints out the current inquiry data. Otherwise, sets inquiry data to data.
inqtype [type] With no type, prints out the current inquiry scan type. Otherwise, sets inquiry scan type to type.
inqparams [win:int] With no win:int, prints inquiry scan window and interval. Otherwise, sets inquiry scan window to win slots and inquiry scan interval to int slots.
pageparms [win:int] With no win:int, prints page scan window and interval. Otherwise, sets page scan window to win slots and page scan interval to int slots.
pageto [to] With no to, prints page timeout. Otherwise, sets page timeout to .I to slots.
afhmode [mode] With no mode, prints out the current AFH mode. Otherwise, sets AFH mode to mode.
sspmode [mode] With no mode, prints out the current Simple Pairing mode. Otherwise, sets Simple Pairing mode to mode.
aclmtu mtu:pkt Sets ACL MTU to to mtu bytes and ACL buffer size to pkt packets.
scomtu mtu:pkt Sets SCO MTU to mtu bytes and SCO buffer size to pkt packets.
delkey <bdaddr> This command deletes the stored link key for bdaddr from the device.
oobdata Get local OOB data (invalidates previously read data).
commands Display supported commands.
features Display device features.
version Display version information.
revision Display revision information.
lm [mode] With no mode , prints link mode. MASTER or SLAVE mean, respectively, to ask to become master or to remain slave when a connection request comes in. The additional keyword ACCEPT means that baseband connections will be accepted even if there are no listening AF_BLUETOOTH sockets. mode is NONE or a comma-separated list of keywords, where possible keywords are MASTER and ACCEPT . NONE sets link policy to the default behaviour of remaining slave and not accepting baseband connections when there are no listening AF_BLUETOOTH sockets. If MASTER is present, the device will ask to become master if a connection request comes in. If ACCEPT is present, the device will accept baseband connections even when there are no listening AF_BLUETOOTH sockets.
AUTHORS
Written by Maxim Krasnyansky <[email protected]> and Marcel Holtmann <[email protected]>
man page by Fabrizio Gennari <[email protected]>
BlueZ Nov 11 2002 HCICONFIG(1)
Manual page hciconfig(1) line 147/169 (END) (press h for help or q to quit)
توجه کنید در خلال آموزش Snoop در دستگاه های بلوتوث دار، صفحه man برای پیکربندی دستگاه های بلوتوثی استفاده می شود. بنابراین اگر دستگاه بلوتوثی خارجی و… را وصل کرده اید، می توانید از آن برای مشاهده دستگاه های متصل و پیکربندی مناسب نیز استفاده کنید. سپس Q را فشار دهید تا از آن خارج شوید. باید دستگاه بلوتوثی را که پیدا کرده اید بردارید و آن را به بالا بیاورید. اکنون Hciconfig و سپس نام دستگاهی را که پیدا کرده اید و در آخر up را تایپ کنید:
hciconfig hci0 up
برای اطمینان از کارکرد آن، دستور Hciconfig را دوباره اجرا کنید:
hciconfig

hci0 Type: Primary Bus: USB
BD Address: ██:██:██:██:██:██ ACL MTU: 1022:8 SCO MTU: 183.5
UP RUNNING
RX bytes:1148 acl:0 sco:0 events:60 errors:0
TX bytes:736 acl:0 sco:0 commands:60 errors:0
قدم دوم Snoop در دستگاه های بلوتوث دار: اسکن دستگاه های بلوتوثی با hcitool
قدم دم در Snoop در دستگاه های بلوتوث دار توجه به اسن است که Hcitool یکی دیگر از ابزارهای داخلی Kali Linux برای پیکربندی و یافتن دستگاه های بلوتوثی در موقعیت مکانی نزدیک است. این ابزار دستور خاصی را به ابزارهای بلوتوثی ارسال می کند. از Hcitool برای جستجو دستگاه های بلوتوثی استفاده کنید که هشدارهای Discover خود را (در حالت Discovery Mood) ارسال می کنند. ابتدا صفحه man آن را بررسی کنید:
man hciconfig
HCITOOL(1) Linux System Administration HCITOOL(1)
NAME
hcitool - configure Bluetooth connections
SYNOPSIS
hcitool [-h]
hcitool [-i <hciX>] [command [command parameters]]
DESCRIPTION
hcitool is used to configure Bluetooth connections and send some spe‐
cial command to Bluetooth devices. If no command is given, or if the
option -h is used, hcitool prints some usage information and exits.
OPTIONS
-h Gives a list of possible commands
-i <hciX>
The command is applied to device hciX , which must be the name
of an installed Bluetooth device. If not specified, the command
will be sent to the first available Bluetooth device.
COMMANDS
dev Display local devices
inq Inquire remote devices. For each discovered device, Bluetooth device address, clock offset and class are printed.
scan Inquire remote devices. For each discovered device, device name are printed.
name <bdaddr> Print device name of remote device with Bluetooth address bdaddr.
info <bdaddr> Print device name, version and supported features of remote device with Bluetooth address bdaddr.
spinq Start periodic inquiry process. No inquiry results are printed.
epinq Exit periodic inquiry process.
cmd <ogf> <ocf> [parameters]
Submit an arbitrary HCI command to local device. ogf, ocf and parameters are hexadecimal bytes.
con Display active baseband connections
cc [--role=m|s] [--pkt-type=<ptype>] <bdaddr>
Create baseband connection to remote device with Bluetooth address bdaddr. Option --pkt-type specifies a list of allowed packet types. <ptype> is a comma-separated list of packet types, where the possible packet types are DM1, DM3, DM5, DH1, DH3, DH5, HV1, HV2, HV3. Default is to allow all packet types. Option --role can have value m (do not allow role switch, stay master) or s (allow role switch, become slave if the peer asks to become master). Default is m.
dc <bdaddr> [reason]
Delete baseband connection from remote device with Bluetooth address bdaddr. The reason can be one of the Bluetooth HCI error codes. Default is 19 for user ended connections. The value must be given in decimal.
sr <bdaddr> <role> Switch role for the baseband connection from the remote device to master or slave.
cpt <bdaddr> <packet types>
Change packet types for baseband connection to device with Bluetooth address bdaddr. packet types is a comma-separated list of packet types, where the possible packet types are DM1, DM3, DM5, DH1, DH3, DH5, HV1, HV2, HV3.
rssi <bdaddr> Display received signal strength information for the connection to the device with Bluetooth address bdaddr.
lq <bdaddr> Display link quality for the connection to the device with Bluetooth address bdaddr.
tpl <bdaddr> [type] Display transmit power level for the connection to the device with Bluetooth address bdaddr. The type can be 0 for the current transmit power level (which is default) or 1 for the maximum transmit power level.
afh <bdaddr> Display AFH channel map for the connection to the device with Bluetooth address bdaddr.
lp <bdaddr> [value] With no value, displays link policy settings for the connection to the device with Bluetooth address bdaddr. If value is given, sets the link policy settings for that connection to value. Possible values are RSWITCH, HOLD, SNIFF and PARK.
lst <bdaddr> [value] With no value, displays link supervision timeout for the connection to the device with Bluetooth address bdaddr. If value is given, sets the link supervision timeout for that connection to value slots, or to infinite if value is 0.
auth <bdaddr> Request authentication for the device with Bluetooth address bdaddr.
enc <bdaddr> [encrypt enable]
Enable or disable the encryption for the device with Bluetooth address bdaddr.
key <bdaddr> Change the connection link key for the device with Bluetooth address bdaddr.
clkoff <bdaddr> Read the clock offset for the device with Bluetooth address bdaddr.
clock [bdaddr] [which clock]
Read the clock for the device with Bluetooth address bdaddr. The clock can be 0 for the local clock or 1 for the piconet clock (which is default).
lescan [--privacy] [--passive] [--whitelist] [--discovery=g|l] [--duplicates]
Start LE scan
leinfo [--static] [--random] <bdaddr>
Get LE remote information
lewladd [--random] <bdaddr>
Add device to LE White List
lewlrm <bdaddr> Remove device from LE White List
lewlsz Read size of LE White List
lewlclr Clear LE White List
lerladd [--local irk] [--peer irk] [--random] <bdaddr>
Add device to LE Resolving List
lerlrm <bdaddr> Remove device from LE Resolving List
lerlclr Clear LE Resolving List
lerlsz Read size of LE Resolving List
lerlon Enable LE Address Resolution
lerloff Disable LE Address Resolution
lecc [--static] [--random] <bdaddr> | [--whitelist]
Create a LE Connection
ledc <handle> [reason]
Disconnect a LE Connection
lecup <handle> <min> <max> <latency> <timeout>
LE Connection Update
AUTHORS
Written by Maxim Krasnyansky <[email protected]> and Marcel Holtmann <[email protected]>
man page by Fabrizio Gennari <[email protected]>
BlueZ Nov 12 2002 HCITOOL(1)
Manual page hcitool(1) line 154/176 (END) (press h for help or q to quit)
در روند Snoop در دستگاه های بلوتوث دار، Hcitool هم برای پیکربندی و هم برای انجام کارهای مختلف مانند اسکن، پرس و جو و یافتن نام، استفاده می شود. این کار برای یادگیری در مورد دستگاه بسیار کاربردی است، اما برخی از این دستورات برای استفاده آسان نیاز به یک آدرس MAC دارند.
ابتدا یک اسکن انجام دهید که برای این کار از خطوط اتصال بلوتوثی، برای اسکن دستگاه های بلوتوث دار در موقعیت مکانی نزدیک به شما استفاده می شود و آدرس های MAC آنها را برای شما پیدا می کند تا بتوانید اسکن های اضافی، پرسش ها یا تلاش برای دریافت نام دستگاه ها را انجام دهید:
 hcitool scan

Scanning...
00:1D:A5:00:09:1D OBDII
برای مثال در بالا یک OBD2 Connector را می بینید که به یک Vehicle متصل است. با آدرس MAC اکنون می توانید دستور دیگری را اجرا کنید، همان موردی که قبلاً از شما آدرس MAC می خواست برای یافتن نام دستگاه در Snoop در دستگاه های بلوتوث دار همانند زیر عمل کنید:
 hcitool name 00:1D:A5:00:09:1D

OBDII
با این روش در Snoop در دستگاه های بلوتوث دار می توانید نام دستگاه را پیدا کنید. درست است که قبلاً با اسکن این کار را کرده بودید ولی دانستن این روش در Snoop در دستگاه های بلوتوث دار سودمند است. برای اطلاعات بیشتر می توانید از دستور inq استفاده کنید:
hcitool inq 00:1D:A5:00:09:1D
Scanning...
00:1D:A5:00:09:1D clock offset: 0x21c0 class: ox5a020c
با این کار Clock Offset و Class را نیز مشاهده می کنید. Class در Snoop در دستگاه های بلوتوث دار نشان می دهد که این دستگاه بلوتوثی از چه نوعی است.
قدم سوم Snoop در دستگاه های بلوتوث دار: اسکن سرویس ها با Sdptool
در این مرحله از Snoop در دستگاه های بلوتوث دار، Sdptool یک خط اتصال برای ابزارهای بلوتوثی است که انجام پرس و جوهای SDP و مدیریت پایگاه داده محلی SDP را فراهم می کند. می توانید Sdptool را برای به دست آوردن اطلاعات بیشتر در مورد Target Contrivance به کار بگیرید.
سپس برای کسب اطلاعات بیشتر در مورد سرویس ها می توانید از ابزاری به نام Sdptool استفاده کنید. حتی جمع آوری اطلاعات درباره آنچه در دستگاه موجود است نیز در Snoop در دستگاه های بلوتوث دار امکان پذیر است. شما باید دوباره از آدرس MAC استفاده کنید، پس ابتدا صفحه man آن را در Snoop در دستگاه های بلوتوث دار بررسی کنید:
man sdptool

sdptool(1) General Commands Manual sdptool(1)

NAME
sdptool — control and interrogate SDP servers

SYNOPSIS
sdptool [options] {command} [command parameters ...]

DESCRIPTION
sdptool provides the interface for performing SDP queries on Bluetooth
devices, and administering a local SDP database.

COMMANDS
The following commands are available. In all cases bdaddr specifies
the device to search or browse. If local is used for bdaddr, then the
local SDP database is searched.

Services are identified and manipulated with a 4-byte record_handle
(NOT the service name). To find a service's record_handle, look for
the "Service RecHandle" line in the search or browse results

search [--bdaddr bdaddr] [--tree] [--raw] [--xml] service_name
Search for services.. Known service names are DID, SP, DUN, LAN, FAX, OPUSH, FTP, HS, HF, HFAG, SAP, NAP, GN, PANU, HCRP, HID, CIP, A2SRC, A2SNK, AVRCT, AVRTG , UDIUE, UDITE and SYNCML.
browse [--tree] [--raw] [--xml] [bdaddr]
Browse all available services on the device specified by a Bluetooth address as a parameter.
records [--tree] [--raw] [--xml] bdaddr
Retrieve all possible service records.
add [ --handle=N --channel=N ]
Add a service to the local SDP database. You can specify a handle for this record using the --handle option. You can specify a channel to add the service on using the --channel option. NOTE: Local adapters configuration will not be updated and this command should be used only for SDP testing.
del record_handle
Remove a service from the local SDP database. NOTE: Local adapters configuration will not be updated and this command should be used only for SDP testing.
get [--tree] [--raw] [--xml] [--bdaddr bdaddr] record_handle
Retrieve a service from the local SDP database.
setattr record_handle attrib_id attrib_value
Set or add an attribute to an SDP record.
setseq record_handle attrib_id attrib_values
Set or add an attribute sequence to an SDP record.

OPTIONS
--help Displays help on using sdptool.

EXAMPLES
sdptool browse 00:80:98:24:15:6D
sdptool browse local
sdptool add DUN
sdptool del 0x10000

BUGS
Documentation needs improving.

AUTHOR
Maxim Krasnyansky <[email protected]>. Man page written by Edd Dumbill <[email protected]>.

sdptool(1)

Manual page sdptool(1) line 60/82 (END) (press h for help or q to quit)
این کار در روند Snoop در دستگاه های بلوتوث دار، به شما امکان می دهد که سرورهای SDP ( پروتکل کشف سرویس ) را پیکربندی و کنترل کنید و مورد تحقیق قرار دهید. در نتیجه شما امکان جستجو در دستگاه های بلوتوثی را خواهید داشت و دقیقاً می فهمید که با مجوزها و سرویس ها چه کارهایی می توان کرد. از صفحه man خارج شوید و Sdptool را تایپ کنید. سپس مرور کرده و آدرس MAC ای را که گرفته اید را دنبال کنید و به مرحله بعدی در Snoop در دستگاه های بلوتوث دار بروید:
sdptool browse 00:1D:A5:00:09:1D

Browsing 00:1D:A5:00:09:1D ...
Service Name: SPP
Service RecHandle: 0x10001
Service Class ID List:
"Serial Port" (ox1101)
Protocol Descriptor List:
"L2CAP" (0x0100)
"RFCOMM" (0x0003)
Channel: 1
در اینجا می توانید در مورد ارتباطات و پروتکل ها، اطلاعات دریافت کنید و حتی شاید بتوانید بفهمید که آیا از MAC Address Randomization یا چیزی شبیه به آن استفاده می کند یا خیر؟ اکنون زمان آن رسید که به قدم چهارم Snoop در دستگاه های بلوتوث دار برویم!
قدم چهارم Snoop در دستگاه های بلوتوث دار: Ping کردن دستگاه های بلوتوثی با l2ping
در ابتدا این مرحله از Snoop در دستگاه های بلوتوث دار، اکنون که آدرس MAC همه دستگاه های مجاور را دارید، می توانید با ابزاری به نام l2ping آنها را Ping کنید تا ببینید در دسترس هستند یا خیر؟ (چه در حالت Discover باشند یا نباشند). در این قدم از Snoop در دستگاه های بلوتوث دار، فقط یک دستگاه وجود دارد. قبل از انجام این کار، صفحه man را برای ابزار اجرا کنید تا همه موارد موجود را ببینید:
man l2ping
L2PING(1) Linux System Administration L2PING(1)
NAME
l2ping - Send L2CAP echo request and receive answer
SYNOPSIS
l2ping [-i <hciX>] [-s size] [-c count] [-t timeout] [-d delay] [-f]
[-r] [-v] bd_addr
DESCRIPTION
L2ping sends a L2CAP echo request to the Bluetooth MAC address bd_addr
given in dotted hex notation.
OPTIONS
-i <hciX> The command is applied to device hciX , which must be the name of an installed Bluetooth device (X = 0, 1, 2, ...) If not specified, the command will be sent to the first available Bluetooth device.
-s size The size of the data packets to be sent.
-c count Send count number of packets then exit.
-t timeout Wait timeout seconds for the response.
-d delay Wait delay seconds between pings.
-f Kind of flood ping. Use with care! It reduces the delay time between packets to 0.
-r Reverse ping (gnip?). Send echo response instead of echo request.
-v Verify response payload is identical to request payload. It is not required for remote stacks to return the request payload, but most stacks do (including Bluez).
bd_addr The Bluetooth MAC address to be pinged in dotted hex notation like 01:02:03:ab:cd:ef or 01:EF:cd:aB:02:03
AUTHORS
Written by Maxim Krasnyansky <[email protected]> and Marcel Holtmann <[email protected]>
man page by Nils Faerber <[email protected]>, Adam Laurie <[email protected]>.
BlueZ Jan 22 2002 L2PING(1)
Manual page l2ping(1) line 32/54 (END) (press h for help or q to quit)
دستگاه های بلوتوثی را در این مرحله از Snoop در دستگاه های بلوتوث دار Ping کنید:
l2ping 00:1D:A5:00:09:1D
Ping: 00:1D:A5:00:09:1D from ██:██:██:██:██:██ (data size 44) ...
44 bytes from 00:1D:A5:00:09:1D id 0 time 37.57ms
44 bytes from 00:1D:A5:00:09:1D id 1 time 27.23ms
44 bytes from 00:1D:A5:00:09:1D id 2 time 27.59ms
44 bytes from 00:1D:A5:00:09:1D id 3 time 27.31ms
44 bytes from 00:1D:A5:00:09:1D id 4 time 40.99ms
44 bytes from 00:1D:A5:00:09:1D id 5 time 48.77ms
44 bytes from 00:1D:A5:00:09:1D id 6 time 59.93ms
44 bytes from 00:1D:A5:00:09:1D id 7 time 48.84ms
44 bytes from 00:1D:A5:00:09:1D id 8 time 67.59ms
این موضوع در Snoop در دستگاه های بلوتوث دار، نشان می دهد که دستگاه در محدوده و قابل دسترسی است. پس اکنون می توانیم به سراغ مراحل بعدی Snoop در دستگاه های بلوتوث دار برویم.
قدم پنجم Snoop در دستگاه های بلوتوث دار: اسکن دستگاه های بلوتوث دار با Btscanner
Btscanner ابزاری است که طراحی شده تا حداکثر اطلاعات را از یک دستگاه بلوتوث در Snoop در دستگاه های بلوتوث دار، بدون جفت شدن جمع آوری کند. برای آغاز این قدم از Snoop در دستگاه های بلوتوث دار، می توانید Btscanner را تایپ کنید. اما قبل از انجام این کار از آنجایی که به صفحات man برای بقیه ابزارها نگاه کردیم، اجازه دهید نگاهی گذرا به اینجا نیز بیندازیم:
man btscanner
BTSCANNER(1) General Commands Manual BTSCANNER(1)
NAME
btscanner - ncurses-based scanner for Bluetooth devices
SYNOPSIS
btscanner [--help] [--cfg <file>] [--no-reset]
DESCRIPTION
This manual page was written for the Debian GNU/Linux distribution be‐
cause the original program does not have a manual page.
btscanner is a tool designed specifically to extract as much informa‐
tion as possible from a Bluetooth device without the requirement to
pair. A detailed information screen extracts HCI and SDP information,
and maintains an open connection to monitor the RSSI and link quality.
btscanner is based on the BlueZ Bluetooth stack, which is included with
recent Linux kernels, and the BlueZ toolset. btscanner also contains a
complete listing of the IEEE OUI numbers and class lookup tables. Using
the information gathered from these sources it is possible to make edu‐
cated guesses as to the host device type.
OPTIONS
--help Show a help text and exit.
--cfg <file> Use <file> as the config file.
--no-reset Do not reset the Bluetooth adapter before scanning.
BUGS
Please report any bugs to Tim Hurman <[email protected]>.
LICENCE
btscanner is covered by the GNU General Public License (GPL).
SEE ALSO
kismet(1).
AUTHORS
Tim Hurman <[email protected]>
This manual page was written by Uwe Hermann <[email protected]>, for
the Debian GNU/Linux system (but may be used by others).
April 22, 2006 BTSCANNER(1)
Manual page btscanner(1) line 23/45 (END) (press h for help or q to quit)
همانطور که در میان روش های Snoop در دستگاه های بلوتوث دار، مشاهده می کنید چیز زیادی برای Btscanner وجود ندارد و علتش این است که این یک ابزار GUI است. در ادامه موارد زیر را جهت تکمیل این قدم از Snoop در دستگاه های بلوتوث دار دنبال کنید:
 btscanner

Opening the OUI database
Reading the OUT database
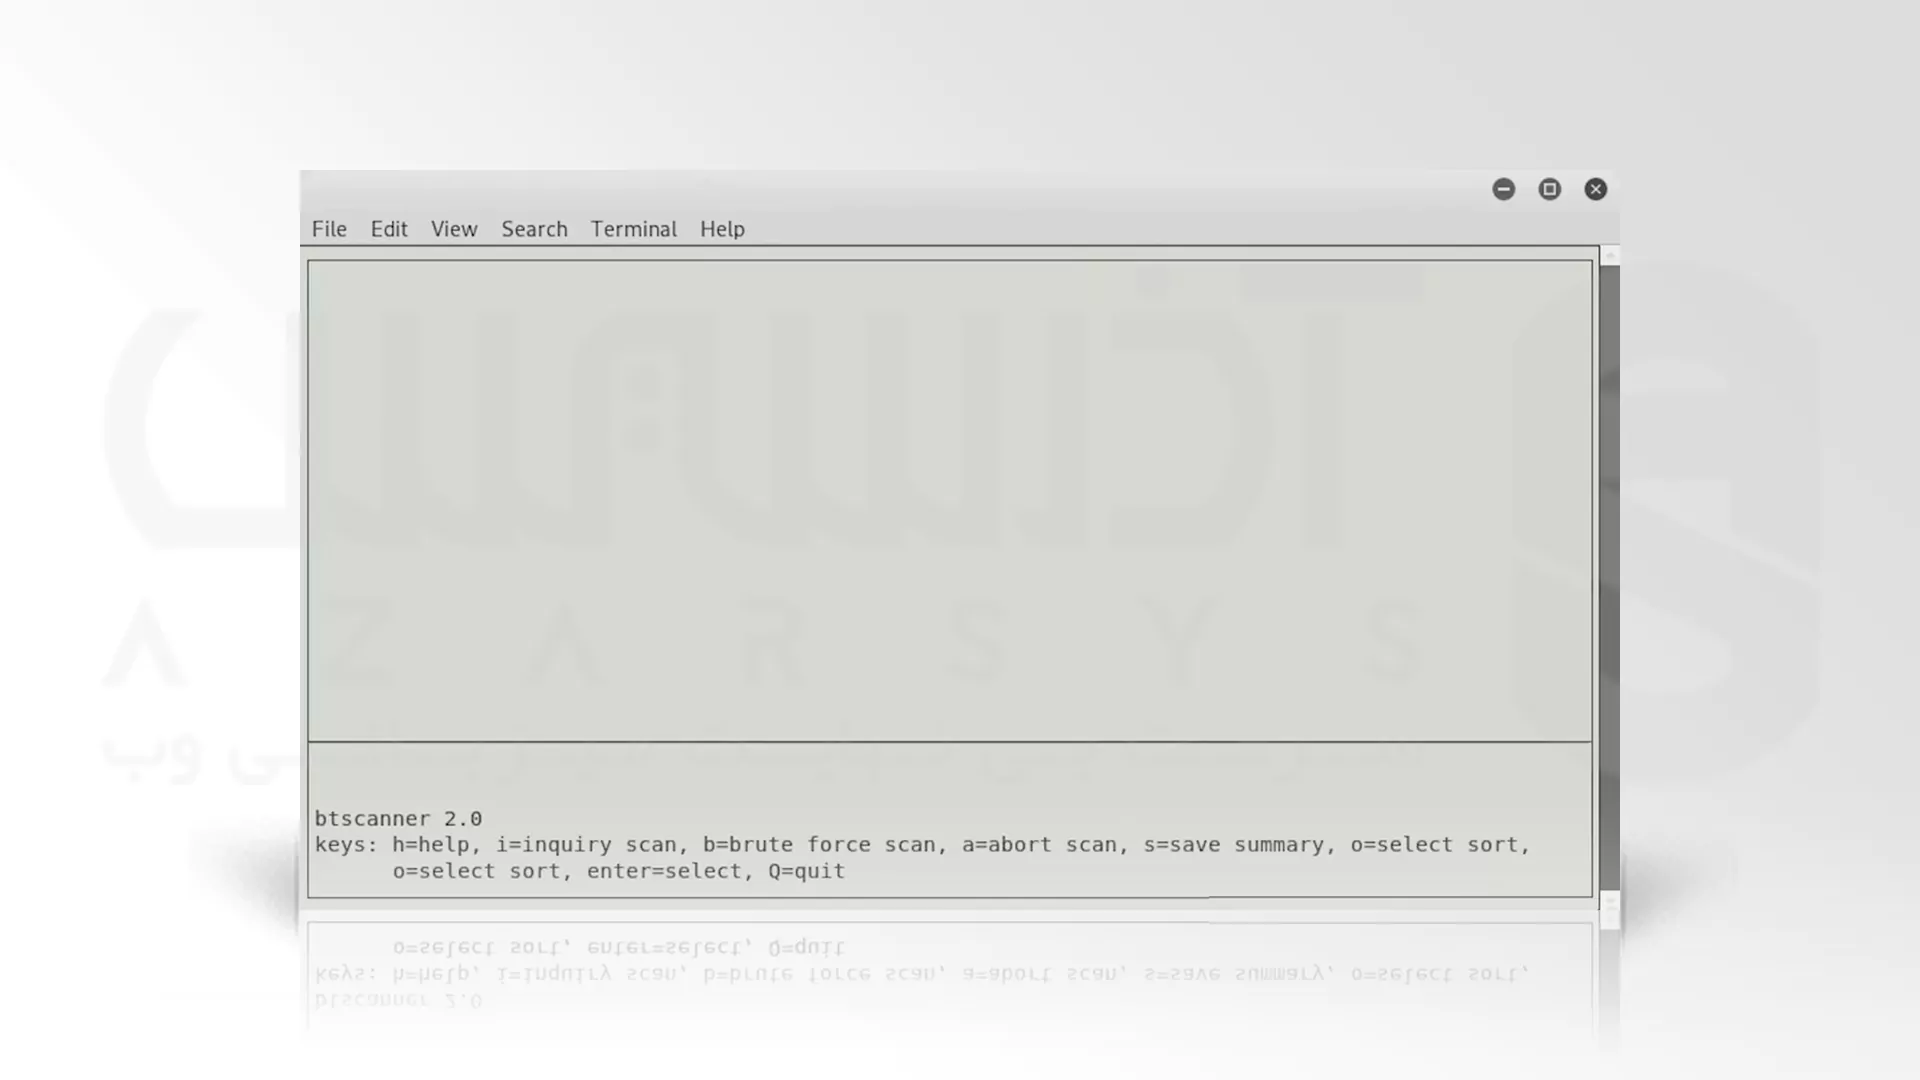
افرادی که قبلاً از Kismet در مراحل Snoop در دستگاه های بلوتوث دار و یا موارد دیگر استفاده کرده اند، شاید این رابط برایشان آشنا به نظر بیاید که به شما اجازه می دهد کارهای زیادی را در فرمت Command_line با یک نوع رابط GUI انجام دهید. با تایپ i می توانید شروع به انجام یک اسکن تحقیقی و یافتن دستگاه های بلوتوث در موقعیت مکانی نزدیکتان کنید:
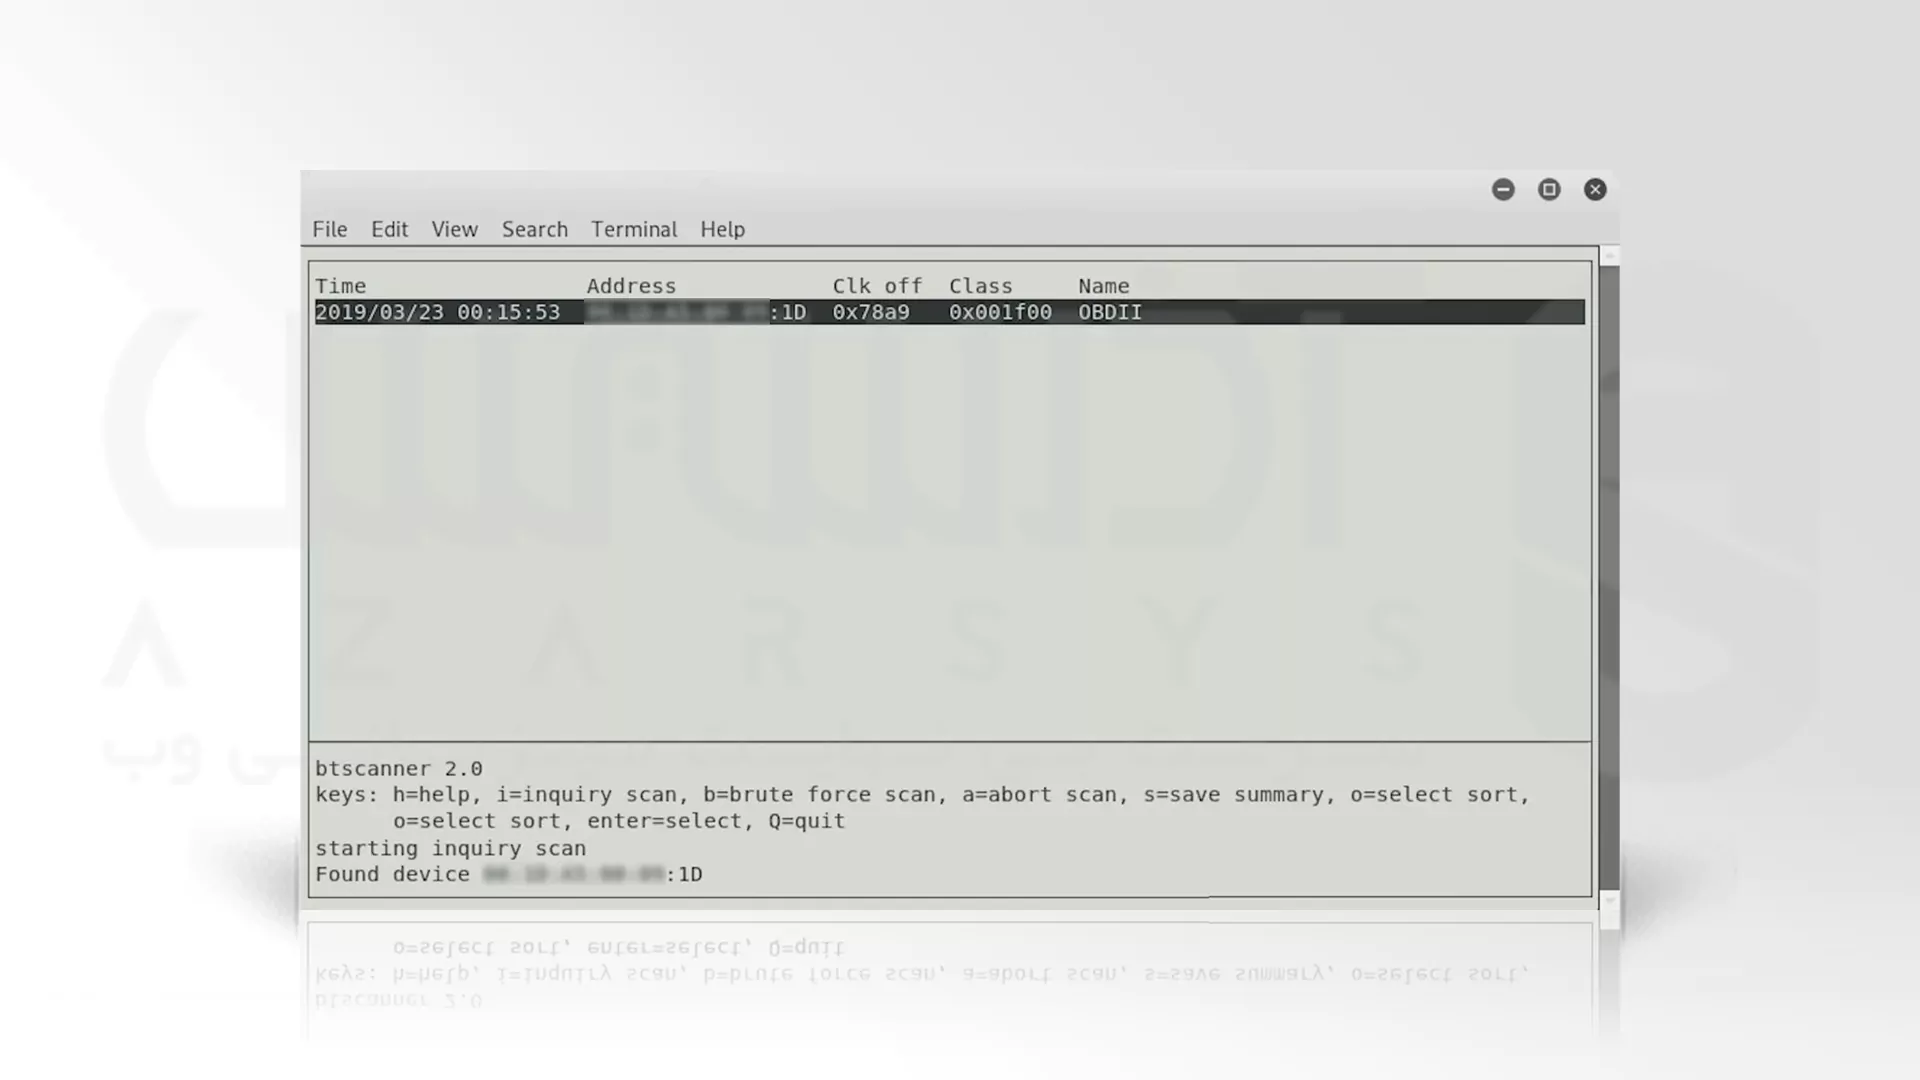
همانطور که می بینید یک دستگاه در ادامه مراحل Snoop در دستگاه های بلوتوث دار پیدا شده و آن همان دستگاه بلوتوثی است که قبلاً دیده بودید. همچنین می توانید برخی از دستگاه های دیگر را در حین ورود پیدا کنید. سپس قدم های Snoop در دستگاه های بلوتوث دار را ادامه دهید و ENTER را فشار دهید تا اطلاعات دستگاه را ببینید:
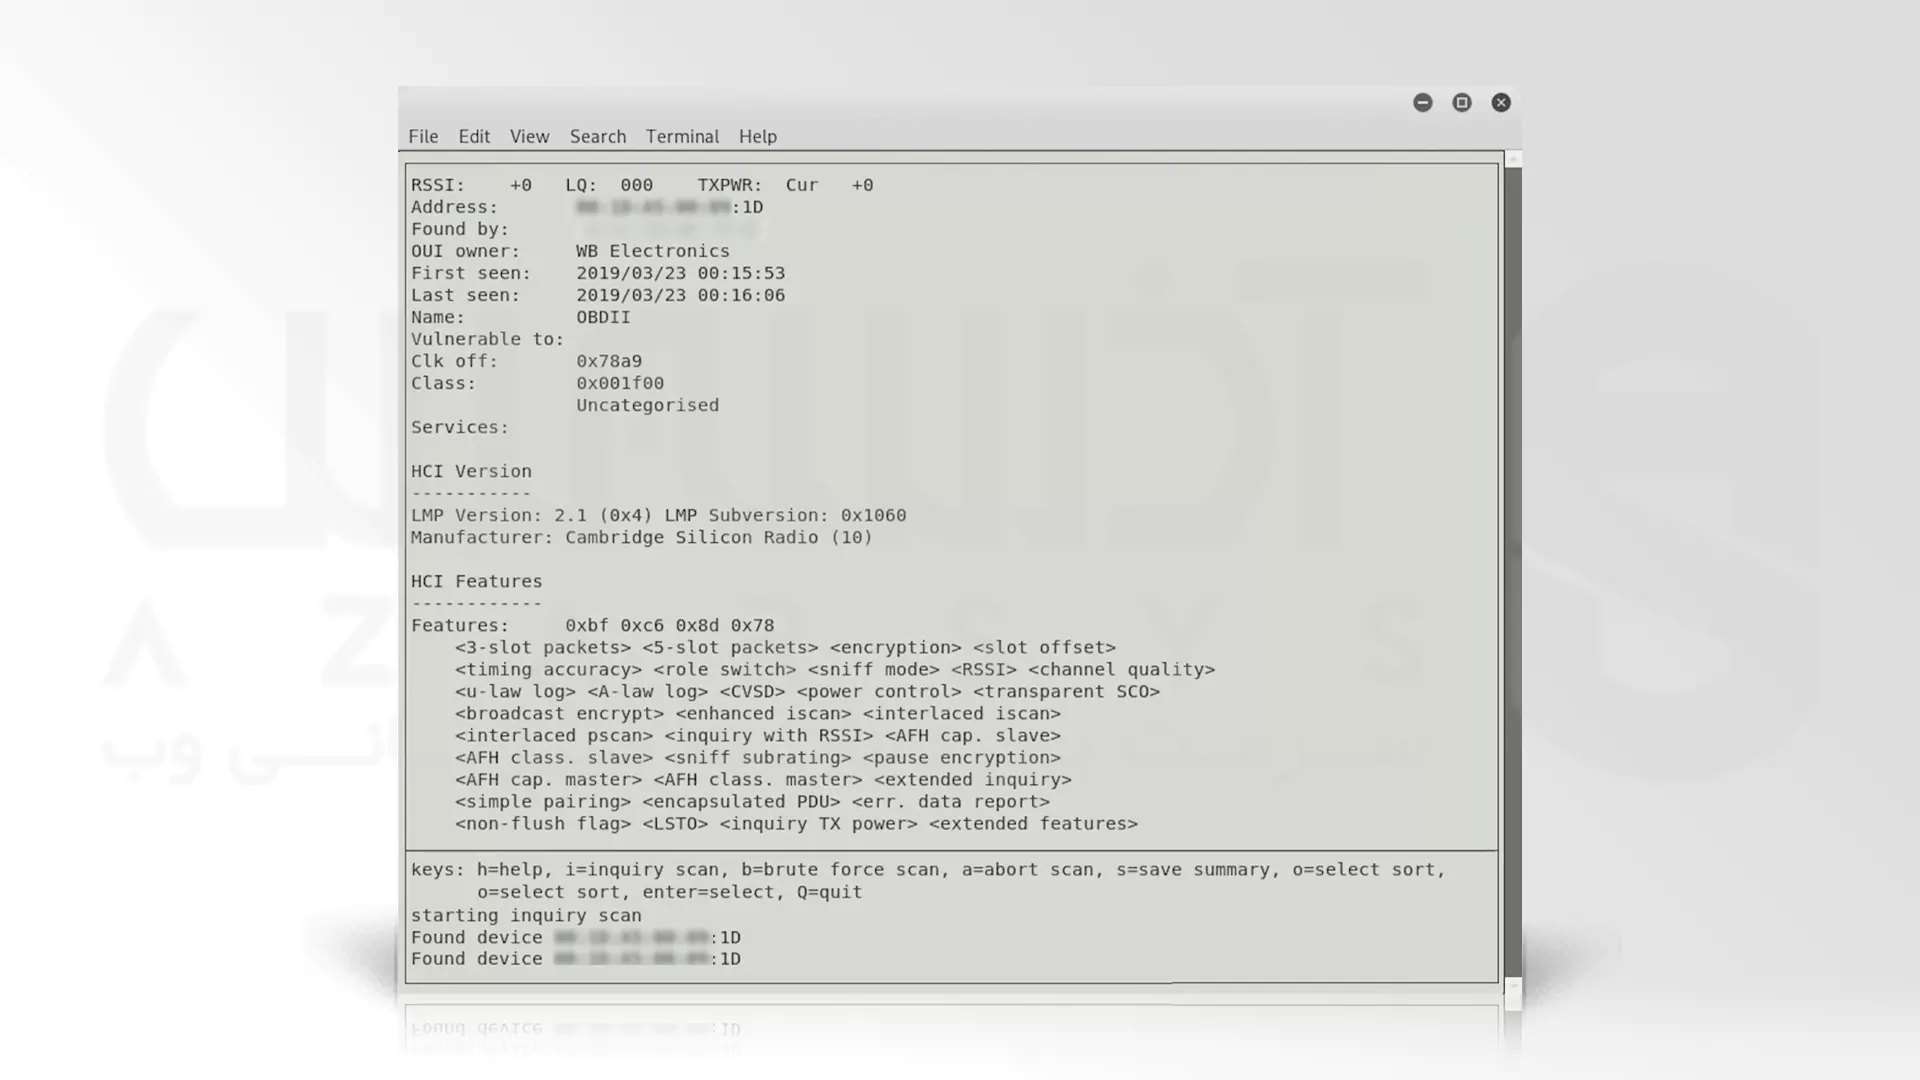
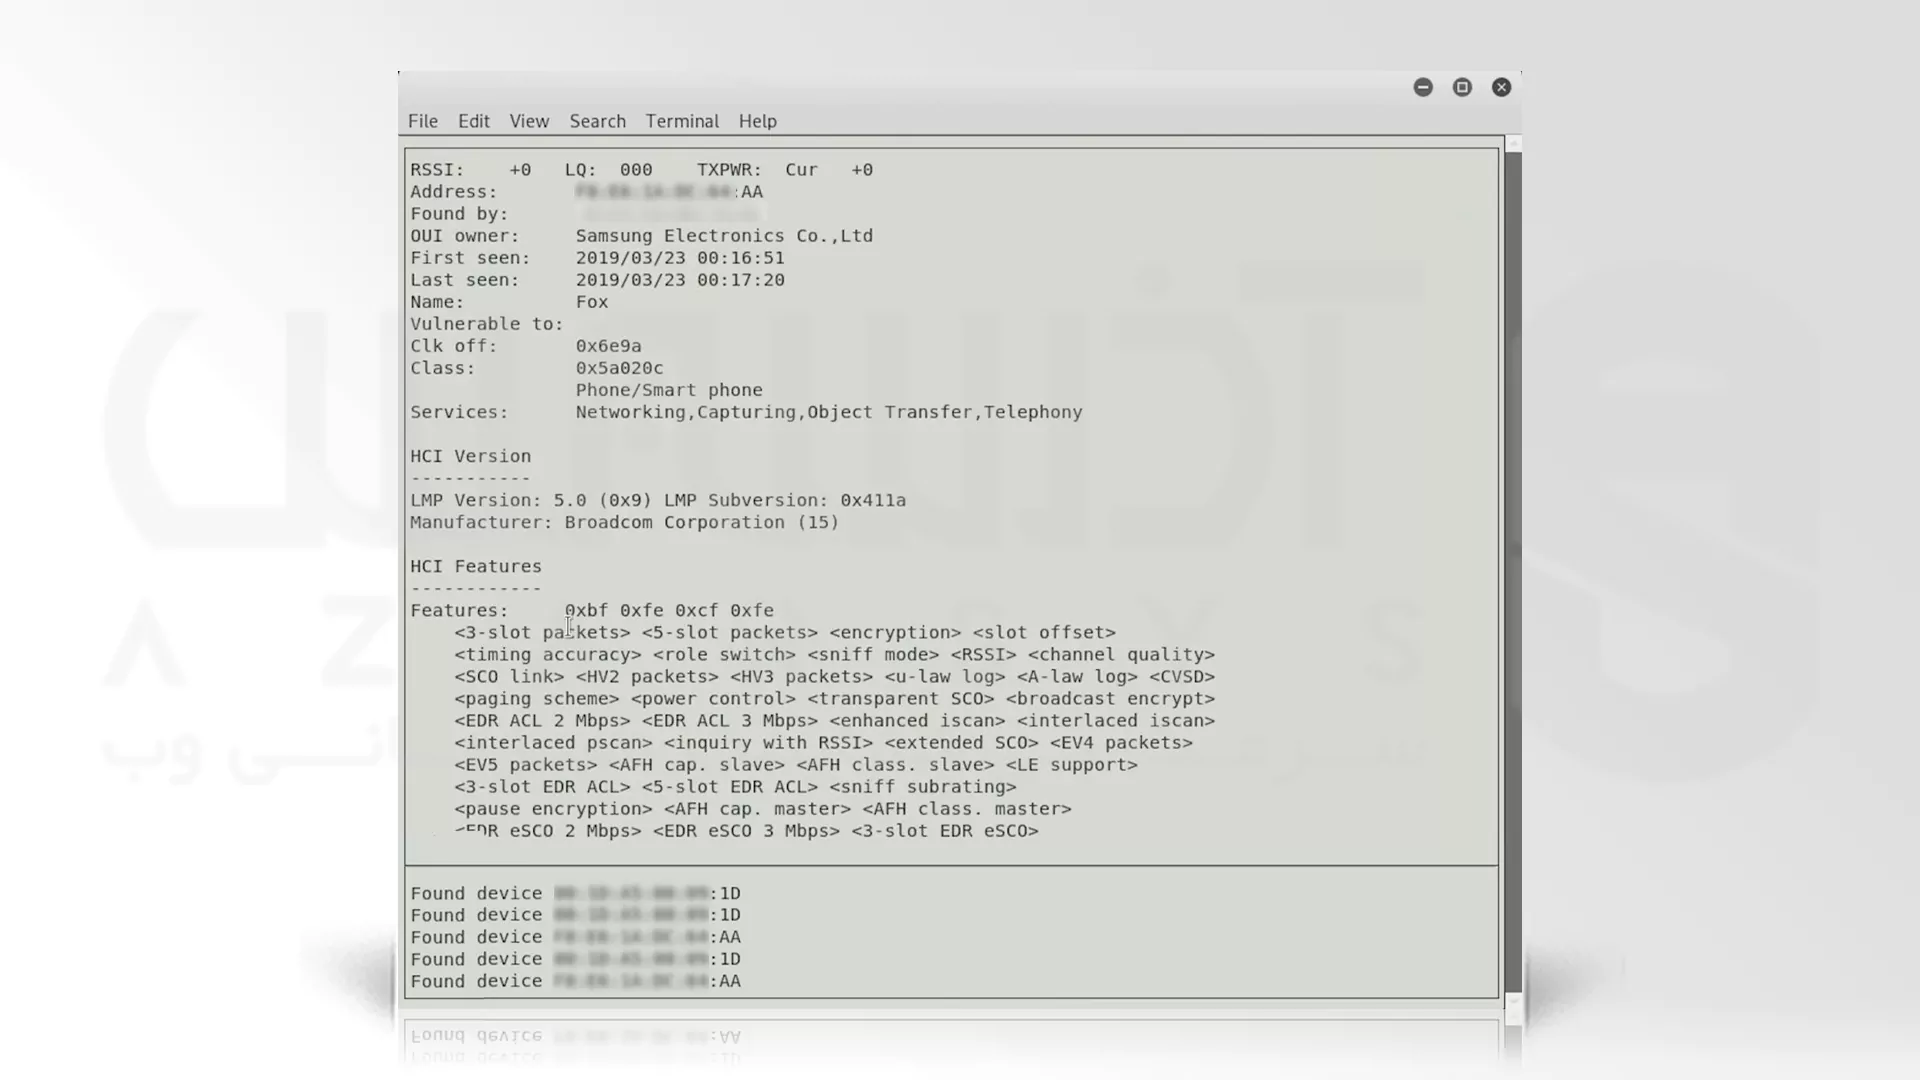
در اینجا می توانید به محض ورود، نام دستگاه و مالک آن را پس از Snoop در دستگاه های بلوتوث دار مشاهده کنید. برای بازگشت به پنجره اصلی Q را فشار دهید. هنگامی که دستگاه های دیگر در Snoop در دستگاه های بلوتوث دار کشف می شوند، یا زمانی که آنها در محدوده قرار می گیرند، می توانید آنها را در اینجا پیدا کنید. مثلا در اینجا کارکرد این دستگاه ها، ارتباط آنها و کارهایی که قادر به انجامش هستند را می توانید مشاهده کنید:
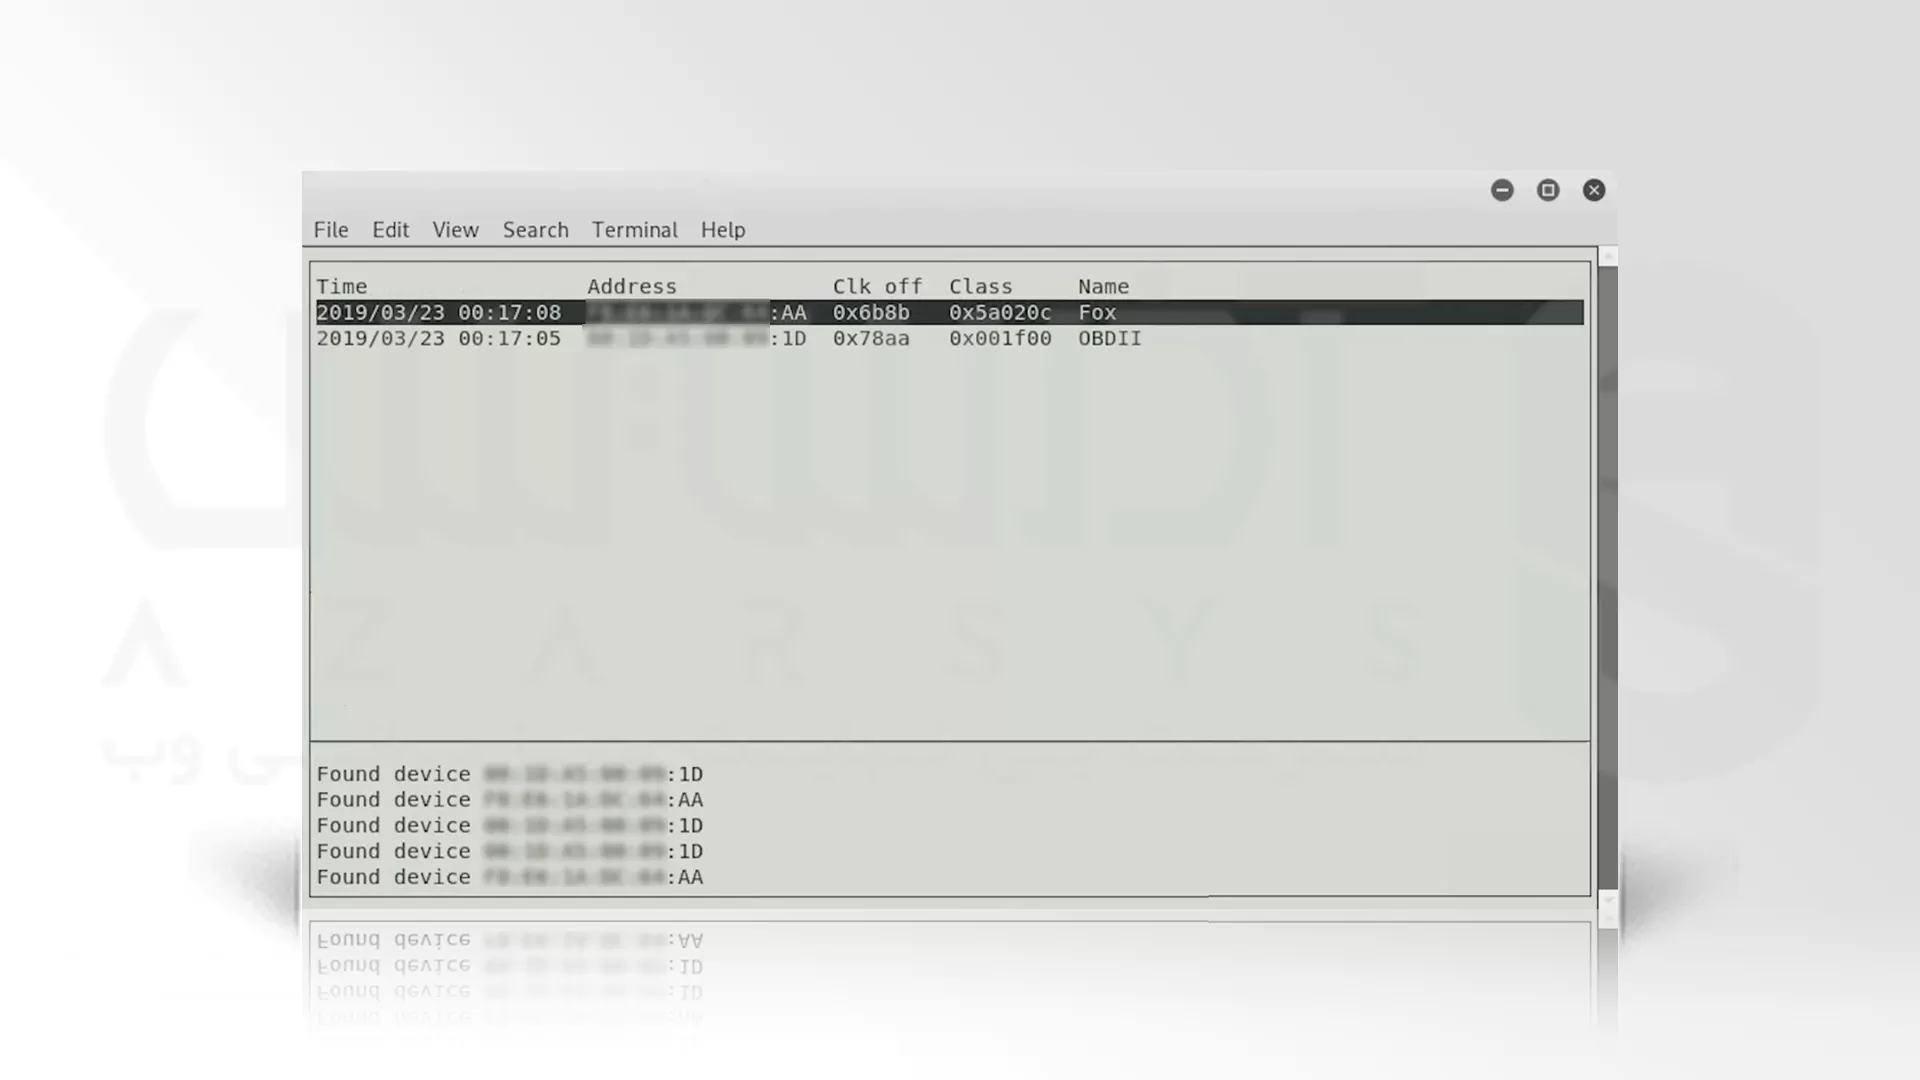
در ادامه مراحل Snoop در دستگاه های بلوتوث دار، اگر بلوتوث روی رایانه تان ندارید می توانید یک آداپتور بلوتوث را وصل کنید، اما قبل از ادامه و رفع مشکل، سازگاری اش را بررسی کنید. برای مثال در بالا یک دستگاه دوم پیدا شده و حال می توانیم روی آن کلیک کنیم:
اکنون که قدم های Snoop در دستگاه های بلوتوث دار در کالی لینوکس را به پایان رساندیم، لازم به ذکر است که جهت Snoop در دستگاه های بلوتوث دار می توانید از سرور اختصاصی در وب سایت آذرسیس با معیار های قابل سفارشی سازی بهره مند شوید. برای شروع بررسی نیازهای سیستمی شما از گزینه ارسال تیکت استفاده نمایید …
سخن آخر
به ترتیب آنچه که در خلال آموزش Snoop در دستگاه های بلوتوث دار فرا گرفتید می توانید از طریق قدم های ذکر شده در این آموزش به دستگاه های دارای بلوتوث نفوذ کنید. اما توصیه امنیتی ما برای حفظ سد امنیت اطلاعات شما این است که از MAC Address Randomization استفاده کنید. هم اکنون سوالات مبهم شما در مورد Snoop در دستگاه های بلوتوث دار را از طریق کامنت پاسخگو هستیم.

